Battery switch on travel trailer function is crucial for managing your RV’s power. This guide dives into the different types of switches, their wiring, troubleshooting, and safety precautions. We’ll cover everything from basic functionality to advanced features, ensuring you’re confident in handling your travel trailer’s electrical system.
Understanding your battery switch is key to preventing costly problems and ensuring a smooth, power-filled camping experience. We’ll explore how these switches protect your batteries, prevent accidental discharge, and allow you to manage power flow efficiently between your house and chassis batteries. Get ready to become a power management pro!
Battery Switch Types in Travel Trailers
Choosing the right battery switch for your travel trailer is crucial for managing power and protecting your electrical system. Different types offer varying levels of control and complexity, each with its own set of advantages and disadvantages. Understanding these differences will help you select the best option for your needs.
Single-Pole Battery Switches
A single-pole battery switch is the simplest type. It allows you to connect or disconnect a single battery from the trailer’s electrical system. This is ideal for smaller trailers with a single battery or for situations where you only need basic on/off control. The switch has one input and one output. Turning the switch “on” connects the battery to the system, while “off” disconnects it, preventing parasitic drain.
Double-Pole Battery Switches
Double-pole switches offer more control, allowing you to switch two separate batteries independently or simultaneously. This is beneficial for trailers with two batteries (e.g., one for house functions and one for starting the tow vehicle), providing flexibility to isolate batteries for maintenance or to manage power usage efficiently. Each battery is connected independently, offering more granular control.
Double-Throw Battery Switches
Double-throw switches provide the most advanced control. These switches allow you to connect either one battery or both batteries to the trailer’s electrical system. This is particularly useful for managing two batteries in parallel for increased power or using one battery for house loads and another for engine starting, while also being able to combine both for increased capacity if needed.
They offer a degree of flexibility not found in simpler switches.
Comparison of Battery Switch Types
| Feature | Single-Pole | Double-Pole | Double-Throw |
|---|---|---|---|
| Number of Batteries Controlled | One | Two (independently) | One or Both (selectable) |
| Level of Control | Basic On/Off | Independent On/Off for each battery | Selection of one or both batteries |
| Typical Cost | Low | Medium | High |
| Typical Applications | Small trailers, single battery systems | Trailers with two batteries (house & starting) | Trailers requiring flexible battery management |
Function and Purpose of the Battery Switch
The battery switch in your travel trailer is a crucial component that controls the flow of power between your trailer’s battery and the electrical system. It acts as a central on/off switch, allowing you to manage power efficiently and protect your investment. Understanding its function is key to preventing problems and ensuring reliable power when you’re on the road.The primary function of the battery switch is to isolate the house battery from the rest of the trailer’s electrical system when not in use.
This prevents the battery from slowly discharging over time due to parasitic drains, which are small electrical currents that continue to draw power even when appliances are turned off. This parasitic drain can come from things like clocks, carbon monoxide detectors, and even the control boards of some appliances. The switch effectively breaks the circuit, stopping this drain and ensuring your battery maintains a charge for when you need it.
Battery Switch Protection of the Electrical System
The battery switch also plays a vital role in protecting the trailer’s electrical system from damage. By disconnecting the house battery when not needed, the switch helps prevent overloads and short circuits that can occur if there’s a problem within the wiring or appliances. This protection extends to preventing damage to sensitive electronics and other components that could be affected by voltage surges or power fluctuations.
A properly functioning switch acts as a safeguard, limiting the potential for costly repairs.
Preventing Accidental Discharge of the House Battery
A key benefit of the battery switch is its ability to prevent the house battery from accidentally discharging. This is especially important during periods of prolonged storage when the trailer isn’t being used. Leaving the switch in the “off” position ensures that the battery retains its charge, preventing it from becoming deeply discharged which can significantly reduce its lifespan or even damage it beyond repair.
So, you’re prepping for a road trip? Awesome! First things first: make sure your travel trailer’s power is sorted. Check out this guide on the battery switch on travel trailer function to avoid any dead-battery surprises. Once that’s done, you can focus on the fun stuff, like setting up your amazing sound system. If you’re an audiophile, you’ll want to check out tips for a killer audiophile travel setup to enjoy your tunes on the road.
Seriously, good sound makes the whole trip better!
This means your battery will be ready to power your lights, appliances, and other systems when you’re next ready to hit the road.
Wiring and Connections of the Battery Switch

Properly wiring your travel trailer’s battery switch is crucial for safe and reliable power management. A correctly installed switch allows you to isolate your house batteries from the chassis battery, preventing unwanted drain and protecting your investment. This section details the typical wiring configuration and best practices for a secure installation.
The basic wiring diagram involves connecting the positive (+) and negative (-) terminals of both your house battery bank and your chassis battery to the battery switch. The switch then provides a controlled connection to the rest of your trailer’s electrical system. It’s essential to understand that incorrect wiring can lead to short circuits, damage to your batteries or electrical components, and even fire hazards.
Therefore, careful attention to detail is paramount.
Typical Wiring Diagram
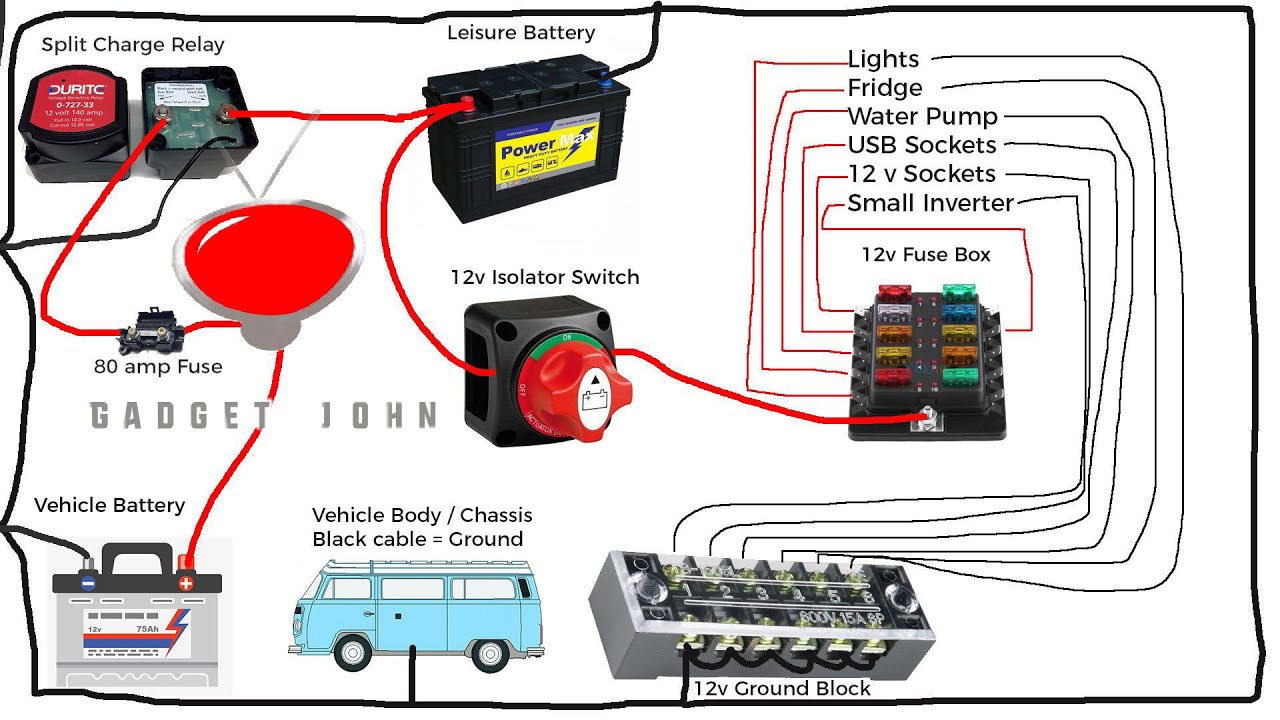
Imagine a simple diagram: The switch is depicted as a central component with four large terminals. Two terminals are labeled “+HOUSE” and “-HOUSE,” representing the positive and negative connections for your house battery bank. The other two are labeled “+CHASSIS” and “-CHASSIS,” connecting to your chassis battery. Thick, appropriately-sized wires connect each battery terminal to its corresponding switch terminal.
From the “+HOUSE” terminal on the switch, a larger wire runs to the positive bus bar of your house electrical system. Similarly, a wire from the “-HOUSE” terminal connects to the negative bus bar. This ensures that the power from the house battery flows through the switch to power the trailer’s appliances and systems only when the switch is engaged.
Note that the chassis battery, often used for starting the tow vehicle, usually maintains a separate circuit.
Connecting the Battery Switch
Connecting the battery switch involves several steps. First, ensure your batteries are disconnected to prevent accidental short circuits. Then, using appropriately sized and insulated wire (at least 6 gauge for most applications), securely connect the positive (+) terminal of your house battery bank to the “+HOUSE” terminal on the battery switch. Repeat this process for the negative (-) terminal, connecting it to the “-HOUSE” terminal.
Next, connect the positive (+) terminal of your chassis battery to the “+CHASSIS” terminal and the negative (-) terminal to the “-CHASSIS” terminal on the switch. Use appropriately sized ring terminals crimped onto the ends of the wires to ensure a solid and secure connection to the switch terminals. Tighten all connections securely with the correct tools to prevent loose connections that could lead to overheating or failure.
Best Practices for Safe Wiring
Several best practices ensure a safe and reliable battery switch installation. Always use appropriately sized wiring to handle the current draw of your electrical system. Undersized wires can overheat and become a fire hazard. Use high-quality marine-grade wire designed to withstand the vibrations and environmental conditions encountered in a travel trailer. Crimp ring terminals securely onto the ends of your wires using the correct crimping tool to avoid loose connections.
Never use tape or other makeshift methods to secure connections. Use heat-shrink tubing over all connections for additional insulation and protection against moisture and corrosion. Clearly label all wires and connections to facilitate troubleshooting and maintenance. Finally, after completing the wiring, use a multimeter to verify all connections and ensure there are no short circuits before reconnecting the batteries.
Troubleshooting Common Battery Switch Issues: Battery Switch On Travel Trailer Function
Your travel trailer’s battery switch is a critical component, ensuring you can power your appliances and systems. When it malfunctions, it can leave you stranded without power. Understanding common problems and how to troubleshoot them can save you time and frustration. This section details common issues and provides a step-by-step guide to get your battery switch working again.
Battery switch problems in travel trailers often stem from simple issues, easily resolved with basic tools and a little know-how. More serious problems may require professional assistance, but a systematic approach can help pinpoint the source of the trouble.
Common Battery Switch Problems
Common problems include corrosion on the terminals, loose connections, a faulty switch itself, and wiring issues. Corrosion builds up over time due to exposure to the elements, creating resistance and preventing proper current flow. Loose connections, often caused by vibration during travel, can lead to intermittent power or complete failure. A faulty switch might be internally damaged, failing to make or break the circuit correctly.
Finally, damaged or improperly connected wiring can disrupt the electrical flow to the batteries and the trailer’s systems.
Troubleshooting Steps
Troubleshooting a malfunctioning battery switch involves a methodical approach, checking each potential problem systematically. Always disconnect the negative battery cable before starting any work to prevent electrical shocks.
- Inspect the Switch and Connections: Begin by visually inspecting the battery switch itself and all connections. Look for signs of corrosion (green or white powdery substance) on the terminals and wires. Tighten any loose connections. If corrosion is present, carefully clean the terminals with a wire brush and baking soda solution.
- Test for Continuity: Use a multimeter to test for continuity across the switch. Set the multimeter to the continuity setting (often symbolized by a diode or a tone). With the switch in the “on” position, touch the probes to the terminals. A continuous tone or reading indicates a good connection. If there’s no continuity, the switch is likely faulty.
Repeat this test with the switch in the “off” position; you should get no continuity.
- Check the Wiring: Carefully examine the wiring leading to and from the battery switch. Look for any broken, frayed, or loose wires. Repair or replace any damaged wiring. Make sure all wire connections are secure and properly crimped.
- Test Battery Voltage: With the switch in the “on” position, measure the voltage at the battery terminals and at the output terminals of the switch. A significant voltage drop indicates a problem within the switch or wiring. If the voltage is low at the battery, the battery itself might be the issue, requiring further investigation.
- Verify Ground Connection: A poor ground connection can mimic battery switch problems. Ensure the ground wire connected to the chassis of the trailer is secure and clean.
Troubleshooting Flowchart
This flowchart provides a visual guide to troubleshooting your battery switch:
- Start: Is there power to the trailer?
- No: Inspect the battery switch and connections for corrosion or loose connections. Clean and tighten as needed.
- Still No Power: Test the switch for continuity using a multimeter.
- No Continuity: Replace the battery switch.
- Continuity Present: Check the wiring for damage or loose connections. Repair or replace as needed.
- Still No Power: Test battery voltage. Is it low?
- Low Battery Voltage: Check the battery and charging system.
- Battery Voltage Okay: Verify the ground connection.
- Still No Power: Seek professional assistance.
- Power Restored: End
Battery Switch Maintenance and Replacement
Regular maintenance of your travel trailer’s battery switch is crucial for ensuring reliable power and preventing costly repairs down the road. Neglecting this simple component can lead to corrosion, poor connections, and ultimately, battery failure. A proactive approach to maintenance will extend the lifespan of your switch and minimize the risk of unexpected electrical issues while you’re enjoying your travels.
Preventative Maintenance Schedule for the Battery Switch
A simple, regular inspection and cleaning routine can significantly extend the life of your battery switch. This should be part of your overall RV maintenance checklist. Failure to address even minor issues can lead to more significant problems.
Ideally, you should inspect your battery switch at least twice a year, or more frequently if you live in a humid or corrosive environment. A visual inspection is the first step. Look for signs of corrosion, loose connections, or damage to the switch itself. If you notice any corrosion, it’s essential to clean it immediately.
Cleaning involves carefully removing any corrosion buildup using a wire brush or a specialized battery terminal cleaner. After cleaning, apply a dielectric grease to the terminals to prevent future corrosion. This grease helps repel moisture and creates a protective barrier. Remember to disconnect the battery before cleaning or working on the switch to prevent accidental shocks.
Replacing a Faulty Battery Switch
Replacing a battery switch is a relatively straightforward task, but it requires careful attention to safety. Improperly replacing the switch could lead to electrical hazards or damage to your RV’s electrical system. Always disconnect the battery’s negative terminal before starting any work.
The process generally involves disconnecting the wires from the old switch, carefully noting their positions. Then, remove the old switch and install the new switch, ensuring the wires are reconnected to the correct terminals. After reconnecting the wires, double-check your work before reconnecting the battery. Finally, test the switch to ensure it functions correctly.
Tools and Materials Needed for Battery Switch Replacement
Before starting the replacement, gather all necessary tools and materials. Having everything prepared beforehand will make the process smoother and safer.
A list of essential tools and materials includes:
- New battery switch (ensure it’s the correct amperage for your system)
- Wrench or socket set (appropriate size for the battery terminals and switch mounting)
- Wire brush or battery terminal cleaner
- Dielectric grease
- Screwdrivers (Phillips and flathead, as needed)
- Multimeter (to test the switch after installation)
- Safety glasses
- Work gloves
Safety Precautions When Working with Battery Switches
Working with batteries and their associated switches in a travel trailer requires careful attention to safety. Improper handling can lead to serious injury from electric shock, burns, or explosions. Always prioritize safety by following established procedures and using appropriate protective equipment.
Battery acid is corrosive and can cause severe burns to skin and eyes. Furthermore, lead-acid batteries produce flammable hydrogen gas, which can ignite explosively if exposed to sparks or flames. The high voltage present in the battery system can deliver a dangerous electric shock, even with the battery switch turned off. Therefore, understanding and adhering to safety precautions is paramount.
Battery Disconnection Before Working
Before undertaking any work on the battery switch, it’s crucial to disconnect the battery. This prevents accidental electrical shocks and short circuits. The correct procedure involves disconnecting the negative (-) terminal first, then the positive (+) terminal. This minimizes the risk of accidental sparking or short circuits during the process. When reconnecting, reverse the order, connecting the positive terminal last.
This is a fundamental safety measure to protect yourself from electrical hazards.
So, you’re prepping for a road trip? Awesome! First things first: make sure your travel trailer’s power is sorted. Check out this guide on the battery switch on travel trailer function to avoid any dead-battery surprises. Then, think about your entertainment – nothing ruins a trip like bad tunes! For the audiophile on the go, setting up a killer soundscape is key.
Consider looking into resources on audiophile travel aetup for tips on portable high-fidelity sound. Get these two sorted and your adventure is off to a great start!
Personal Protective Equipment (PPE), Battery switch on travel trailer function
Working with batteries and electrical systems necessitates the use of appropriate personal protective equipment (PPE). This includes safety glasses or goggles to protect your eyes from splashes of battery acid or debris. Rubber gloves are essential to protect your hands from corrosive battery acid and electric shocks. Closed-toe shoes should always be worn to protect your feet from potential hazards.
Consider using a face shield for added protection, especially when working with older batteries that might leak more readily.
Ventilation and Fire Safety
Always work in a well-ventilated area when handling batteries. Hydrogen gas, a byproduct of battery operation, is highly flammable. Ensure that there are no open flames, sparks, or sources of ignition nearby. Smoking should be strictly prohibited while working with batteries. If you detect any unusual odors (such as the pungent smell of hydrogen sulfide), immediately stop work and ventilate the area.
Proper Tool Usage
Use insulated tools specifically designed for electrical work. Avoid using metal tools that might create sparks or conduct electricity. Keep your work area clean and organized to minimize the risk of accidental contact with the battery terminals or other components. Ensure that all tools are in good working order before you begin.
Emergency Preparedness
Have a fire extinguisher readily available in case of an emergency. Know the location of the nearest fire alarm and emergency exits. Familiarize yourself with the proper procedures for dealing with battery acid spills or electrical shocks. Having a plan in place before you begin work can help you react calmly and effectively in an emergency.
Advanced Battery Switch Features and Technologies
Basic battery switches are simple on/off devices, but the market offers more sophisticated options for managing your travel trailer’s power. These advanced features enhance convenience, monitoring, and overall power management. Understanding these features can help you choose the best switch for your needs and budget.
Many modern battery switches incorporate features beyond simple on/off functionality. These advancements offer improved control and monitoring capabilities, leading to a more efficient and user-friendly power system in your RV.
Remote Control Capabilities
Some advanced battery switches offer remote control options, allowing you to switch between battery banks or disconnect the battery from the trailer remotely. This is particularly useful if your battery switch is located in a hard-to-reach area, such as under the trailer. Remote control can be achieved through various methods, including wireless remotes, smartphone apps, or integration with your RV’s control system.
This eliminates the need to crawl under your RV to switch batteries, especially useful in inclement weather. The convenience factor is a major advantage. However, a drawback could be the additional cost and potential for the remote control system to malfunction.
Battery Monitoring Features
Certain battery switches include integrated monitoring capabilities. These features provide real-time information on battery voltage, current, and state of charge. This data is invaluable for preventing battery drain and optimizing charging. Some advanced systems can even predict battery life expectancy based on usage patterns. The benefit here is proactive maintenance and preventing unexpected power outages.
A drawback might be the added complexity and the cost of the monitoring system. A simpler system might only display voltage, while a more sophisticated system could provide much more detailed data, potentially even integrating with other RV systems for comprehensive monitoring.
Comparison of Battery Switch Brands and Models
Choosing the right battery switch depends on your needs and budget. Here’s a comparison of some features and prices (note that prices can vary depending on retailer and time of purchase):
| Brand | Model | Features | Approximate Price (USD) |
|---|---|---|---|
| Blue Sea Systems | 7625 | Dual battery switch, manual operation | $50 – $70 |
| AGS | Automatic Charging System | Automatic switching, voltage sensing | $200 – $300 |
| Progressive Dynamics | PD9260C | Remote control, battery monitoring | $300 – $400 |
| Victron Energy | Orion-Tr Smart DC-DC Charger | Smart charging, Bluetooth connectivity, extensive monitoring via app | $400 – $600+ |
Mastering your travel trailer’s battery switch is about more than just flipping a switch; it’s about understanding your RV’s electrical system and ensuring safe and reliable power. By understanding the different types of switches, their wiring, and potential issues, you can confidently maintain and troubleshoot your system, preventing costly repairs and ensuring many happy camping trips. So, get out there and enjoy the open road – powered up and ready to go!
FAQ
What happens if my battery switch is faulty?
A faulty switch can lead to power loss, battery drain, or even electrical damage. Symptoms include no power to appliances, dead batteries, or blown fuses.
How often should I inspect my battery switch?
Inspect your switch at least once a year, or more frequently if you use your RV extensively. Look for corrosion, loose connections, and any signs of damage.
Can I replace a battery switch myself?
Yes, but it requires basic electrical knowledge and caution. Always disconnect the battery before working on the switch. If unsure, consult a professional.
What type of battery switch is best for my travel trailer?
The best type depends on your specific needs and battery configuration. A double-pole, double-throw switch offers the most control, but a simpler single-pole switch might suffice for a single battery setup.
